Tree Wind Animation with PivotPainter2 in Unreal and Houdini
Intro
A few years ago, I experimented with the Pivot Painter toolset to create vertex animations for plant growth. Back then, I was on a tight schedule, so I only focused on the “Scale by Hierarchy” setup and didn’t dive into the wind-related configurations or how the tool handles wind animation under the hood.
The reason I’m revisiting Pivot Painter now is because I’ve been researching wind animation solutions for vegetation. Over the past month, I’ve been digging into how Ubisoft’s in-house engine handles plant wind systems—both the logic and the implementation.
Initially, I was planning to store all the necessary wind-related data in a DataTable, pass it to a Compute Shader for threaded processing, and then feed the resulting rotation quaternions directly into the Vertex Factory. But while thinking through the whole pipeline, I was reminded of how Pivot Painter stores its data entirely in texture maps and decodes them in the material editor, a much more efficient approach in many cases - no aggresive manipulation to the shading model of Unreal, everything can happen independently in the material level.
Since I had already built an automated pipeline in Houdini for preparing plant assets (including LOD processing, recording pivot positions, branch tip positions, painting vertex color masks for seasonal blending, and organizing hierarchy data), it felt like a natural next step to integrate that data into Houdini’s built-in Unreal Pivot Painter 2.0 nodes to generate the required texture maps for Pivot Painter working in Unreal.
That said, it wasn’t exactly a one-click solution. I ended up spending two or three days debugging and made a few small tweaks to the Pivot Painter 2.0 node network to better fit the structure of my data. This article is mainly a breakdown of that process.
Two RGBA Textures
Pivot Painter typically generates two textures: RGB channel to store a vector and alpha channel to store either an integer or a float. Each texture uses a regenerated UV2 channel to encode per-vertex data.
When it comes to wind animation, the data required by both the Ubisoft engine and the Pivot Painter shader are almost identical: the pivot position of each trunk/branch/leaf, the index of its parent, the forward direction of the branch/leaf, and the branch extent length. These four pieces of data are enough to reconstruct the tree’s hierarchy and to drive wind weights, rotation quaternions, and pivot positions for procedural wind animation. In the Ubisoft engine, the data is stored in a table, where each branch’s corresponding parameters are saved. The branch data is indexed by storing the branch ID in a UV channel, which acts as a lookup reference. In Pivot Painter’s approach, the branch ID is indexed through the arrangement of UV2. For example, for vertex 0, if the branch ID is 10, the UV2 of vertex 0 will be placed at the 10th pixel in the texture.
Pivot Position and Parent Index

For the first texture (pivot position and parent index), these two pieces of data are required for almost any animation setup. The pivot position is used to construct the center of rotation or scaling, while the parent index is used to find the parent and build the hierarchy.
Construct the Hierarchy
So how exactly does Pivot Painter reconstruct the original hierarchy from the pre-baked data?
To understand this, especially for wind animation, we need to first look at how animation relates to hierarchy. Take the example below:
imagine a tree with four levels—root → big branch → small branch → leaf. The animation also breaks down into 4 layers:
- The trunk sways around its own pivot, driving the movement of the entire tree.
- The big branch sways around its own pivot, affecting both the small branch and the leaf attached to it.
- The small branch sways around its own pivot, driving the leaf.
- The leaf moves with its own local sway animation.
The motion has to start from the root and cascade down the hierarchy, with each level inheriting the transformation from the level above. This is what allows each branch to have its own rotational movement based on its direction and length. So for every processed vertex, the shader needs to:
- Know its own ID.
- Use that ID to look up the stored parent ID.
- Traverse up the chain all the way to the root, keeping track of how many levels it passes through—this depth determines which animation tier should be applied to that vertex.
Find the Parents
Now let’s take a look at how Unreal’s Pivot Painter Foliage Shader actually works. First, you can check out the official sample project provided by Unreal: Content Examples
This package includes a bunch of very helpful official demos. For the Pivot Painter Foliage Shaders pecifically, navigate to: Engine/Content/Functions/Engine_MaterialFunctions02/PivotPainter2/PivotPainter2FoliageShader.uasset
Then let’s take a look at the beginning of this material function. First off, this entire material block is focused on processing the alpha channel of the PivotPos & ParentID texture—that alpha channel stores the ParentID, which gets decoded and converted back into an integer: 
Look closer to the 4 squares that I put corresponding images to visualize the output ↓ 
These four layers of UV output actually represent four results: its own UV, its parent UV, its grandparent UV, and its great-grandparent UV.
At the first row, you’ll see that it simply uses the raw UV2 output, this is the UV that can sample their own data.
In the second tree, if you look closely, the leaves use the UV of the small branch, the small branch uses the big branch’s UV, and the big branch uses the root’s UV.
In the third tree, the pattern continues—small branch, big branch, and the root all use the root’s UV, only the leaf is using big branches’ UV.
Whichever UV is used here determines which ID will be read—so in the case of the last tree, it means every vertex, from leaf to root, will use the root’s pivot.
Get the Hierarchy Depth
One really important and honestly pretty clever step in this process is calculating the hierarchy depth. So how is that done?
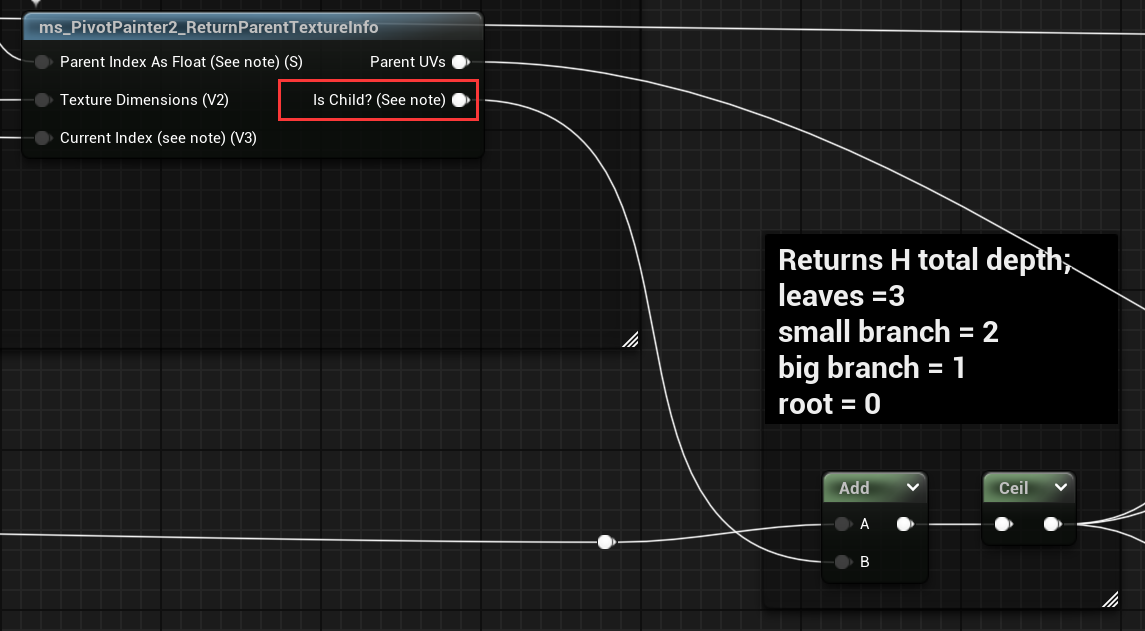
Inside the ms_PivotPainter2_ReturnParentTextureInfo node, there’s an output named Is Child?. It compares the current vertex’s branchID with its parentID. If they’re the same, it means this vertex is the root, so it returns 0. If they’re different, that means the vertex still has a parent to trace, and it returns 1.
This return value gets accumulated across each level. For example, a leaf will go through this check three times—adding 1 each time—so it ends up with a depth value of 3.
This final value is then used as the Lerp factor in the next step when blending between UVs for different animation layers.
Find the Right UV
Now let’s move on to the next material block. This section builds on the previous one, and the goal here is to assemble the correct pivot positions for the four animation layers.
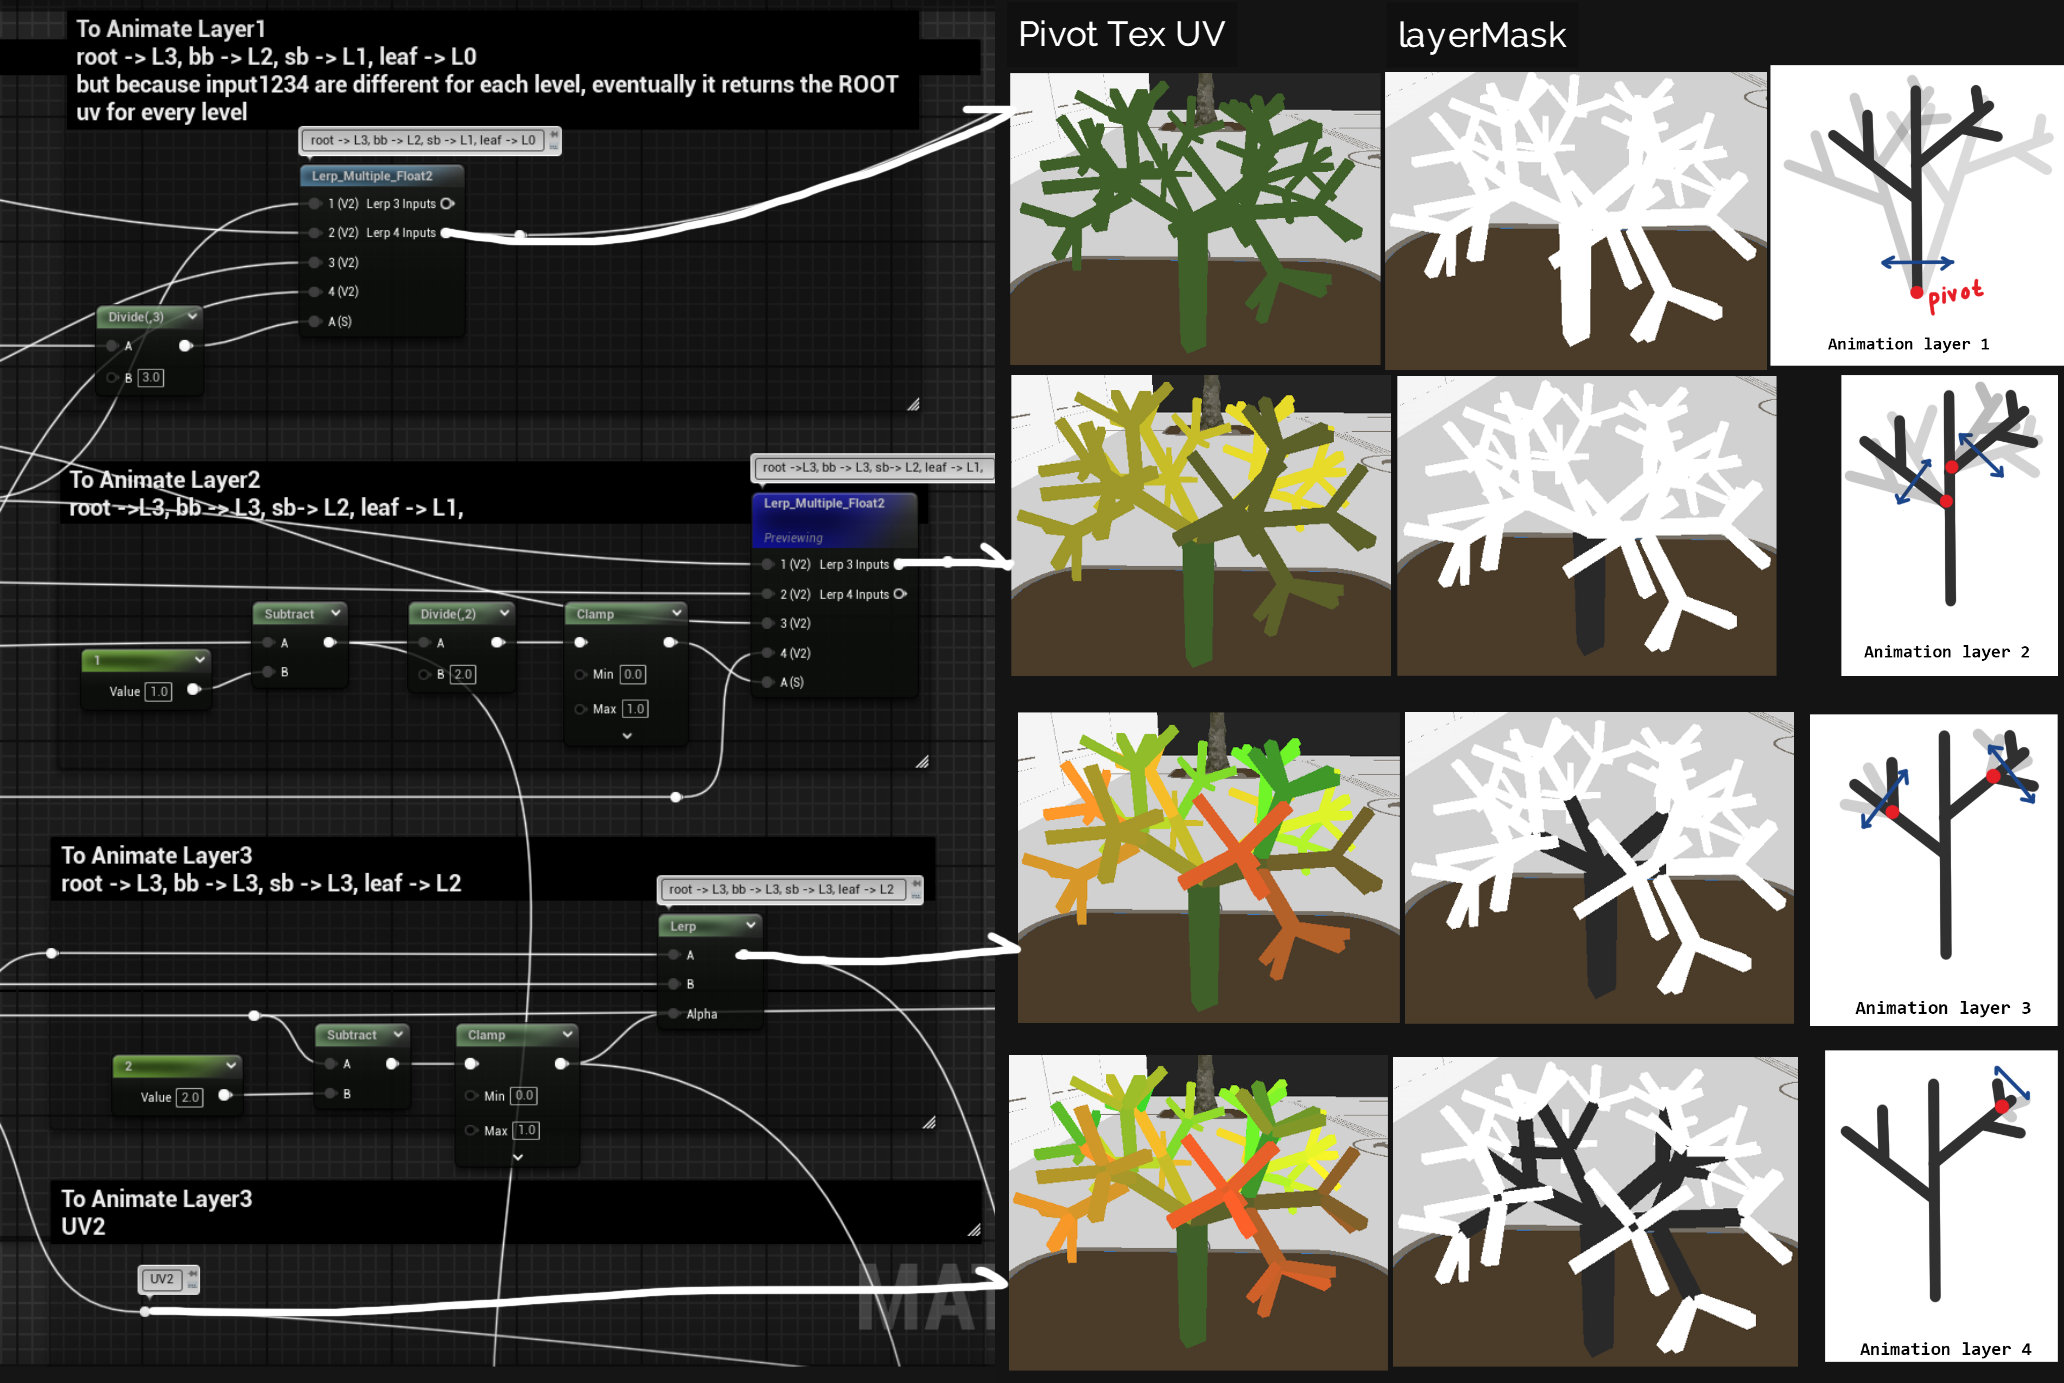
First, the top row uses a multi-lerp node between four UV inputs to generate a result where all vertices use the root’s UV—this corresponds to the Animation Layer 1 we mentioned earlier.
In the second row, we want everything at the big branch level and below (like small branches and leaves) to rotate around the big branch’s pivot. This is done using some math tricks, to combine the UVs generated in the previous step, the shader creates the appropriate UV reference.
The third and fourth rows follow the same logic, adjusting pivot positions for the small branch and leaf levels.
You might wonder: when animating the third layer (e.g., leaves), won’t the presence of UVs from lower layers cause interference? Since the UV input technically includes all layers? This is where the layer mask comes in. That’s the black-and-white tree shown in the second column of the image above. When processing, for example, the leaf layer, all higher levels are masked out (i.e., black), which effectively zeros out their rotation contribution.
At this point, the most important steps are done. Next, the processed parameters are passed into four instances of the PivotPainter2FoliageAnimation function, which compute the final vertex offsets. Each animation layer outputs its own offset, and add the result before processing the next layer of animation.
There are a few key points in the animation section that are worth highlighting, these concepts are quite general and apply to most tree wind animations. Before I go over these, I’ll start to talk about what adjustment I did in houdini in order to export the correct pivot texture firstly.
In Houdini
Houdini also provides an example .hip file for reference, along with an official tutorial and documentation Houdini PIVOT PAINTER.
Strangely though, the provided file doesn’t quite match what’s shown in the demo video—but it’s still useful as a data reference. One thing you’ll notice is that the demo tree is modeled directly inside Houdini, and its structure is fairly simple.
In my case, I’m working with trees created and exported from SpeedTree, so I had to do some extra processing in Houdini to extract the parameters needed for the Pivot Painter textures: Pivot Position, Parent ID, Branch Forward Direction (which Pivot Painter refers to as XVector), and Forward Extent (XExtent). These four pieces of data are essential.
Get Pivot Position
Let’s first take a look at how to obtain the Pivot Position. I won’t explain each node here in detail, as I plan to write a separate article specifically about the Houdini HDA toolchain I used for preprocessing plant assets, where I’ll explain everything in more depth.
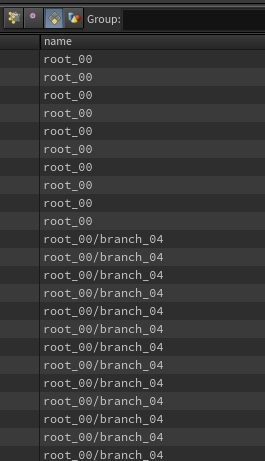
For each standard tree model, the first thing to confirm is the file structure. Taking this example tree, which I’ve grouped temporarily, as an example:
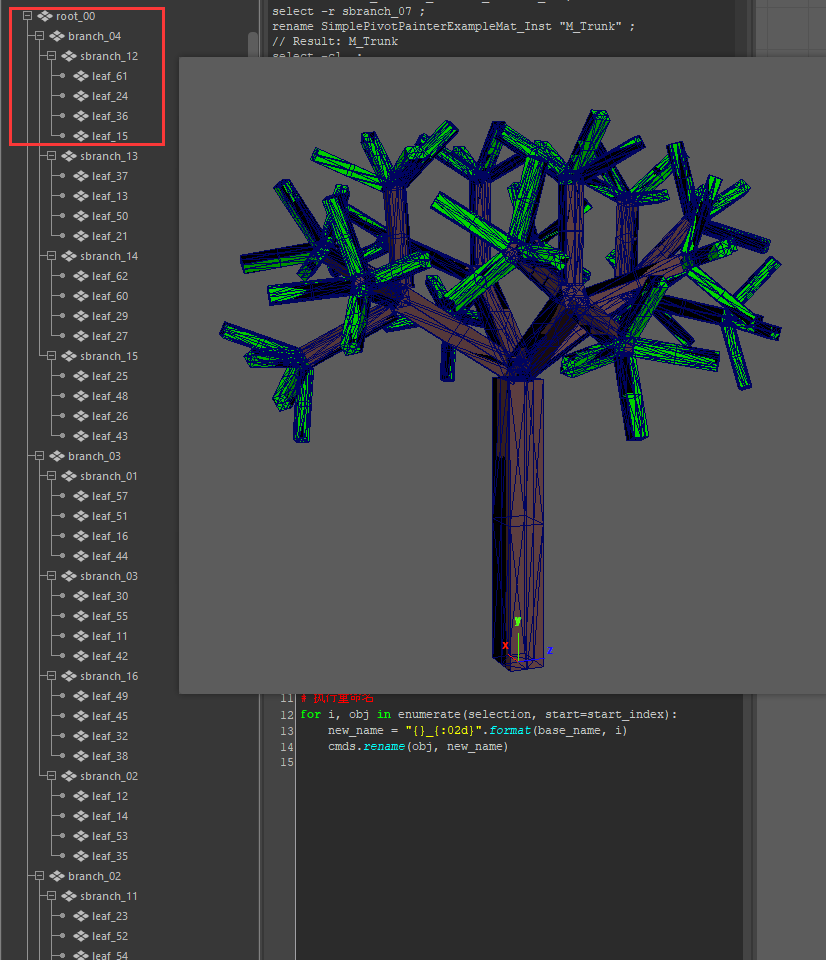
each layer of the tree needs to be clearly separated, and the model should be exported in FBX format without merging the meshes. When the FBX is imported into Houdini, it will come with an attribute called name. This is basically the grouping information I just mentioned, and it will also serve as the Hierarchy for the tree later.
Once the model is properly grouped, it’s easy to process each branch or leaf using the Connectivity node and a For Each Piece loop. For example, in the image below, the Connectivity node is used to create a class attribute, which is then used to randomly color the pieces. It’s clear that each branch is treated as an individual piece. 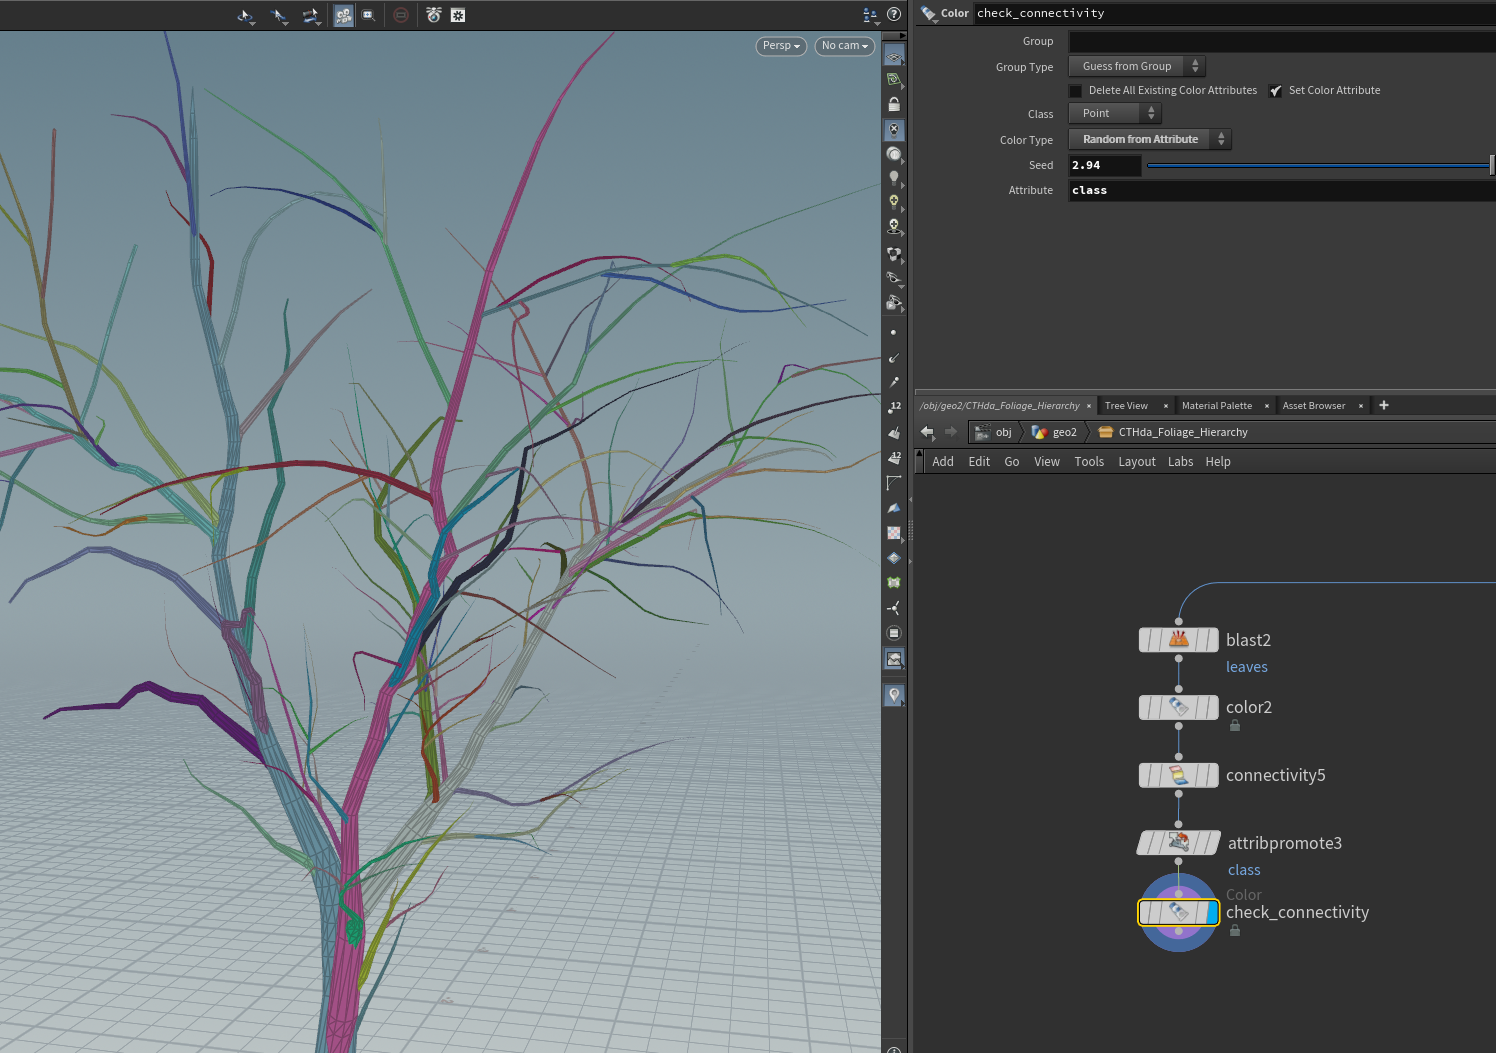
Now, how do we find the pivot? Every branch has a contact surface with other trunks or branches. This surface is usually hollow, with a looped edge that doesn’t share any primitives with other geometry. 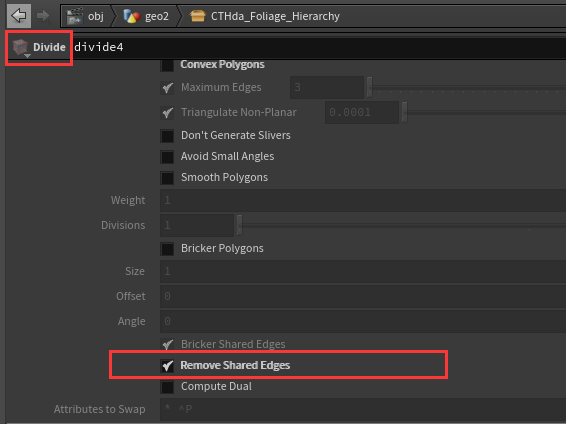
To find that edge, we can use the Divide node and enable the Remove Shared Edges option. Once we have that edge, we can calculate the average position of a few points along the edge, and that’s the pivot position. 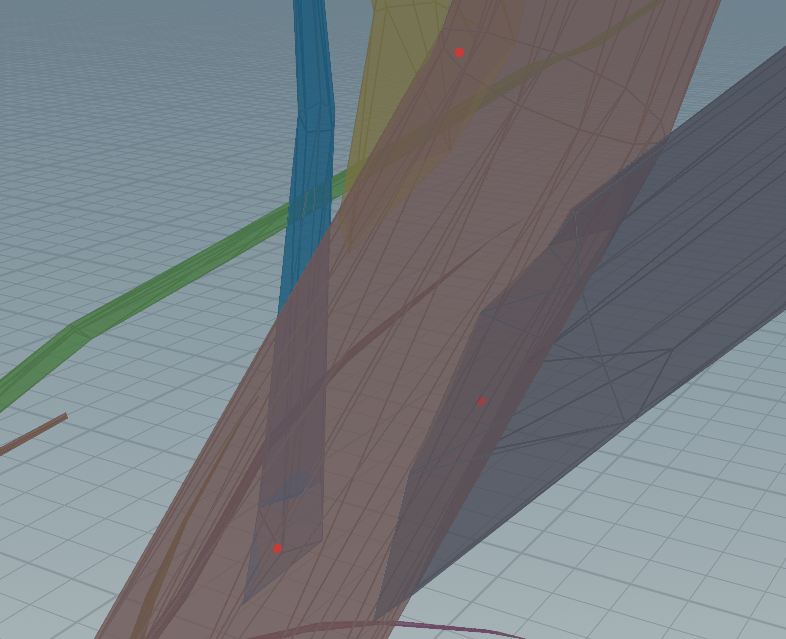
Inside the Unreal Pivot Painter node, a number of calculations are actually performed to generate required parameters like pivot position and parent index.

However, for various reasons, these calculations didn’t work properly with my SpeedTree model—the texture hierarchy came out incorrect, and the pivot positions were off as well.
So I spent some time debugging the data directly on the model and also digging into what the Pivot Painter node is actually doing. It turns out that all the data generation and collection happens inside the DataPacking node: 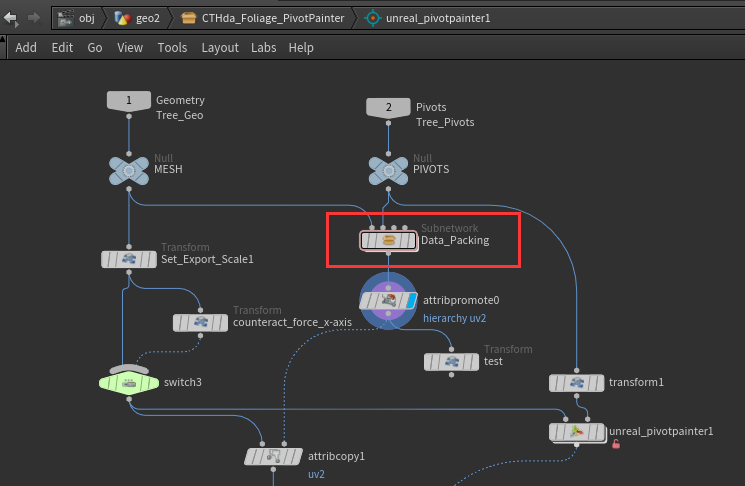
For it to work properly, your model needs to have a valid hierarchy structure. From what I’ve observed, the hierarchy in Pivot Painter seems to follow a specific naming rule: it must start with something like root_0/xxx/xxx. Originally, my hierarchy started with Trunk/xxx/xxx, which caused issues—so I’m guessing the root level must explicitly include the keyword root.
What is XVector?
In the example scene provided by Unreal, there’s a simple foliage animation demo tree, in its material you’ll find its second texture is XVector_a_XExtent, means this texture is exported through this setup:
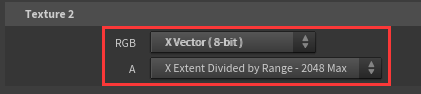
What exactly are ObjectBasisVectorsX and OriginExtents? At first, I thought they simply represented the branch direction and branch length—which would make sense, because the cross product between the branch direction and the wind direction gives you the torque vector. And from a physics standpoint, that torque determines the direction the branch should sway or rotate in the wind. However, from the wind animation node, it seems PivotPainter is using XVector as the torque vector, and XVector was created in the first sub-node of the DataPacking node (Get Bounding Attributes node).
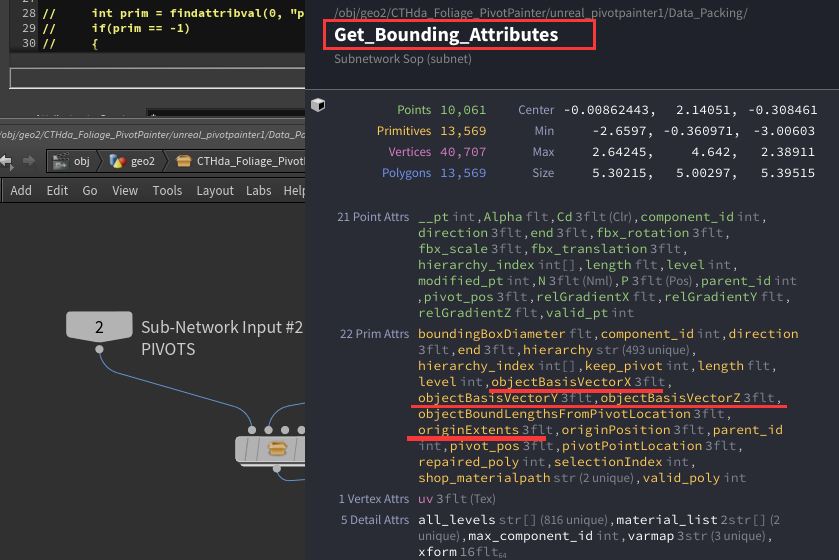
This node essentially calculates the bounding box for each branch, and get the X vector of the bounding box, looks like this:

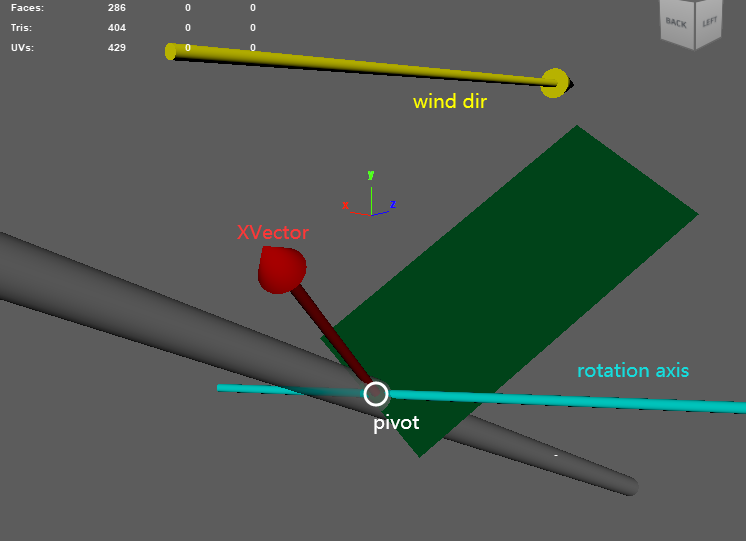
Then, in the Pivot Painter wind animation node, it decodes this texture and extracts the XVector, which is then crossed with the wind direction to calculate the rotation axis:
1
float3 axis = normalize(cross(XVector, WindDir));
This gives you the axis around which the forward vector would rotate under wind influence. Visually, it means if wind is blowing toward a leaf, the leaf will sway back and forth in that direction, and the axis of that sway is defined by the result of this cross product, like in image below, the green plane will rotate around the cyan axis:
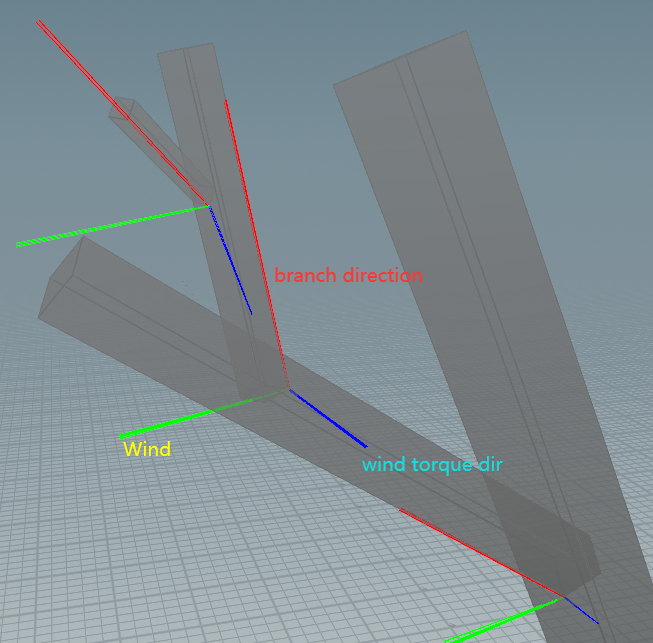
If we wanted to go for a more physically accurate simulation, we’d need to calculate torque first, then get angular acceleration, angular velocity, angular displacement, inertia, etc.—and integrate all of that frame by frame to update the rotation. Even with an approximate approach, I think it still makes more sense to treat the branch direction as the lever arm, and then compute the torque vector as the cross product of wind direction and lever arm (aka branch direction). That torque direction should also be the axis of rotation, like below of my prototype:
So in the end, I still stored the branch direction in XVector. In Houdini, I computed it by taking the vector from the pivot position to the tip of the branch, normalized it as the direction, and used the distance between two points as the branch length, which I stored in the alpha channel.
Some Tips
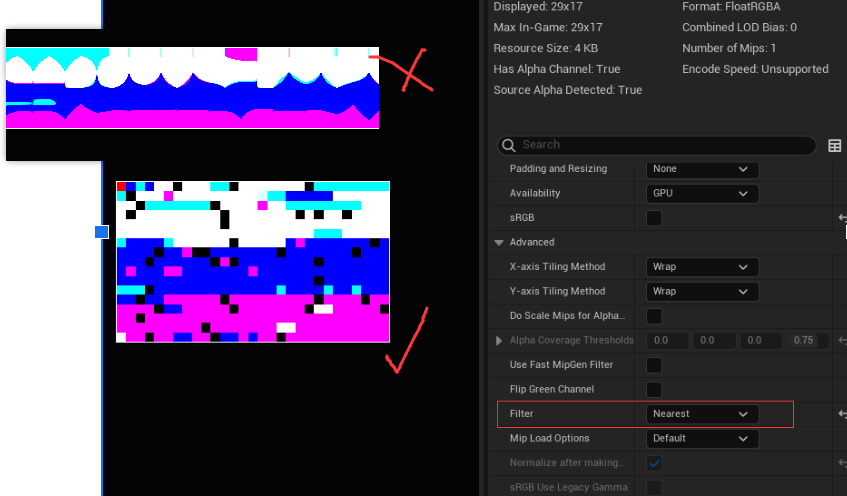
Texture Filter
After export and import the textures, remember to set the texture filter to Nearest, otherwise your texture is not pixel by pixel:
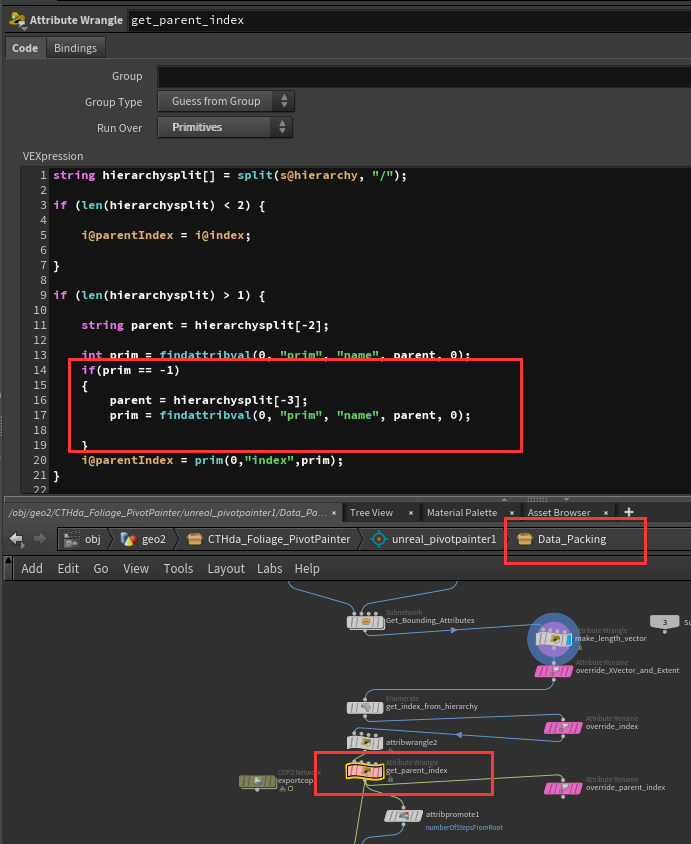
Find Parent Id Bug
As I mentioned earlier, the imported tree initially had hierarchy issues. The problem was in the DataPacking node, specifically during the step where it tries to find each branch’s parent index. The node doesn’t actually perform any failure checks, so if a branch can’t locate its proper parent based on the hierarchy (e.g. some leaves have an empty object as parent in its FBX), then in Houdini, this return -1 when findattribval() can’t find a valid primitive, meaning the parent doesn’t exist. To fix this, I added a simple check that looks one level higher if the immediate parent is missing.
Wrongly Connected Pieces
Another issue I ran into was with disconnected branches. Even though some small branches were clearly separated from the main trunk in the hierarchy, their IDs and pivot positions somehow still followed the trunk. This made their movement unnaturally stiff.
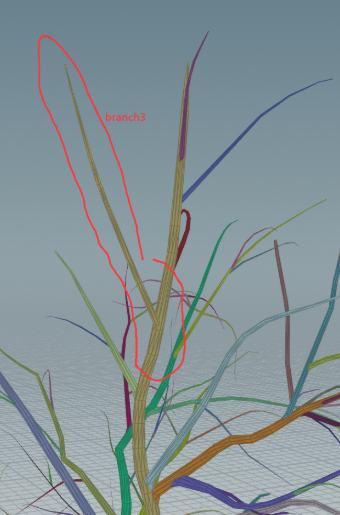
After some debugging, I realized that although these branches looked visually disconnected in Maya, once imported into Houdini, they were being treated as part of the same connected piece, most likely due to shared topology or hidden geometry links.
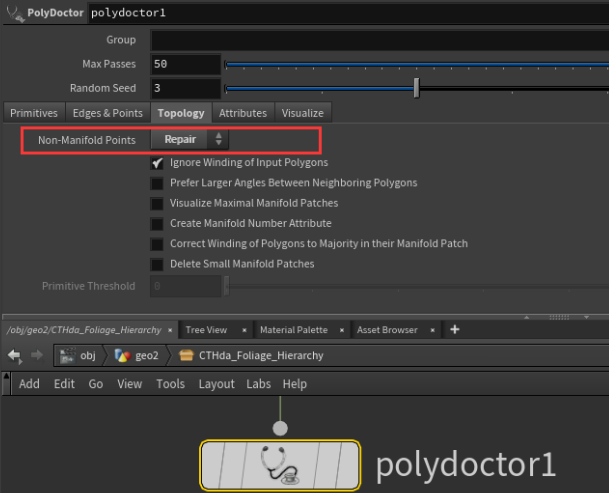
To solve this, I added a PolyDoctor node before building the hierarchy to clean up any non-manifold geometry or wrongly connected components. This helped separate out the branches properly and restored correct motion.
Wrap Up
Alright, I think that wraps up all the parts I consider important for understanding and using this toolchain. In a way, this article is also a response to my past self from a few years ago—back then, my understanding of Houdini was pretty basic, so I couldn’t really tweak the HDAs myself. I also didn’t grasp the physics behind foliage wind or the kinds of data it required. A lot of the issues I ran into felt confusing and hard to troubleshoot.
Now, I’m able to build the tools I need in Houdini for my workflow, and I can confidently debug problems when they come up.
Looking back, I guess I’ve grown quite a bit! :-D